15 Days of Playwright - Day 2: Browser Interactions and Assertions
Learn how to click, fill forms, check checkboxes, and assert page state using Playwright's built-in locators and test hooks. Hands-on with a real BugBank flow.
Jhonatas Matos

After install and setup, let's dive into the first test and interaction with elements. In this lesson, we will explore how to interact with elements on a page, make assertions about the state of the page, and use test hooks to manage our test lifecycle.
Exploring our project
Lets recap our first test
We only navigate to the homepage of BugBank, check if the URL is correct, check if the body is visible, and take a screenshot of the page.
const { test, expect } = require('@playwright/test');

test('BugBank - homepage load and screenshot', async ({ page }, testInfo) => {
  await page.goto('https://bugbank.netlify.app');

  await expect(page).toHaveURL(/bugbank\.netlify\.app/);

  await expect(page.locator('body')).toBeVisible();

  await page.screenshot({
    path: testInfo.outputPath('homepage.png'),
    fullPage: true,
  });
});
Understanding the structure
This line imports the necessary functions from the Playwright testing library:
const { test, expect } = require('@playwright/test');
This line defines a test case with a descriptive name and an asynchronous function that receives the page object and testInfo as parameters:
test('BugBank - homepage load and screenshot', async ({ page }, testInfo) => {

});
This line navigates to the BugBank homepage:
await page.goto('https://bugbank.netlify.app');
This line asserts that the page URL is correct:
await expect(page).toHaveURL(/bugbank\.netlify\.app/);
This line asserts that the page content is visible:
await expect(page.locator('body')).toBeVisible();
This line takes a screenshot of the page:
await page.screenshot({
  path: testInfo.outputPath('homepage.png'),
  fullPage: true,
});
Interactions
In Playwright, you can interact with elements on the page using various methods provided by the API. Here are some common interactions you can perform:
Clicking an element: You can click on an element using the click method.
await page.getByRole('button').click();
Filling a form: To fill out a form field, use the fill method.
await page.getByPlaceholder('Email').fill('user@bugbank.com');
Checkboxes and radio buttons: Use the check method to select a checkbox or radio button.
await page.getByLabel('I agree to the terms above').check();
Select an option from a dropdown: Use the select method to choose an option from a dropdown.
await page.getByLabel('Choose a color').selectOption('blue');
Hovering over an element: You can hover over an element using the hover method.
await page.hover('div.tooltip');
These are just a few examples of how you can interact with elements in Playwright. The API provides many more methods for different types of interactions, so be sure to check the documentation for more details.
Check the Actions page to see more details about the available methods.
Assertions
In Playwright, you can make assertions about the state of the page using the expect function.
Here are some common assertions you can perform:
Checking the URL: You can assert that the page URL is correct.
await expect(page).toHaveURL(/bugbank\.netlify\.app/);
Checking element visibility: You can assert that an element is visible on the page.
await expect(page.locator('body')).toBeVisible();
Checking element text: You can assert that an element contains specific text.
await expect(page.locator('h1')).toHaveText('Welcome to BugBank');
I really advise you to read it the detailed page about assertions, because there you will find more examples and explanations principle about auto-retrying assertions.
Test hooks
In Playwright, you can use test hooks to set up and tear down your tests. The most common hooks are:
beforeAll: Runs once before all tests in a file.beforeEach: Runs before each test in a file.afterEach: Runs after each test in a file.afterAll: Runs once after all tests in a file.
Here's an example of using test hooks:
const { test, expect } = require('@playwright/test');

test.beforeAll(async ({ browser }) => {
  // Code to run before all tests
});

test.beforeEach(async ({ page }) => {
  // Code to run before each test
});

test.afterEach(async ({ page }) => {
  // Code to run after each test
});

test.afterAll(async ({ browser }) => {
  // Code to run after all tests
});
Improving our project
Now that we have a basic test in place, we can start improving our project by adding more tests and enhancing the existing ones.
First of all I will clean our project deleting unnecessary files and folders. This will help me keep the project organized and make it easier to manage our tests.
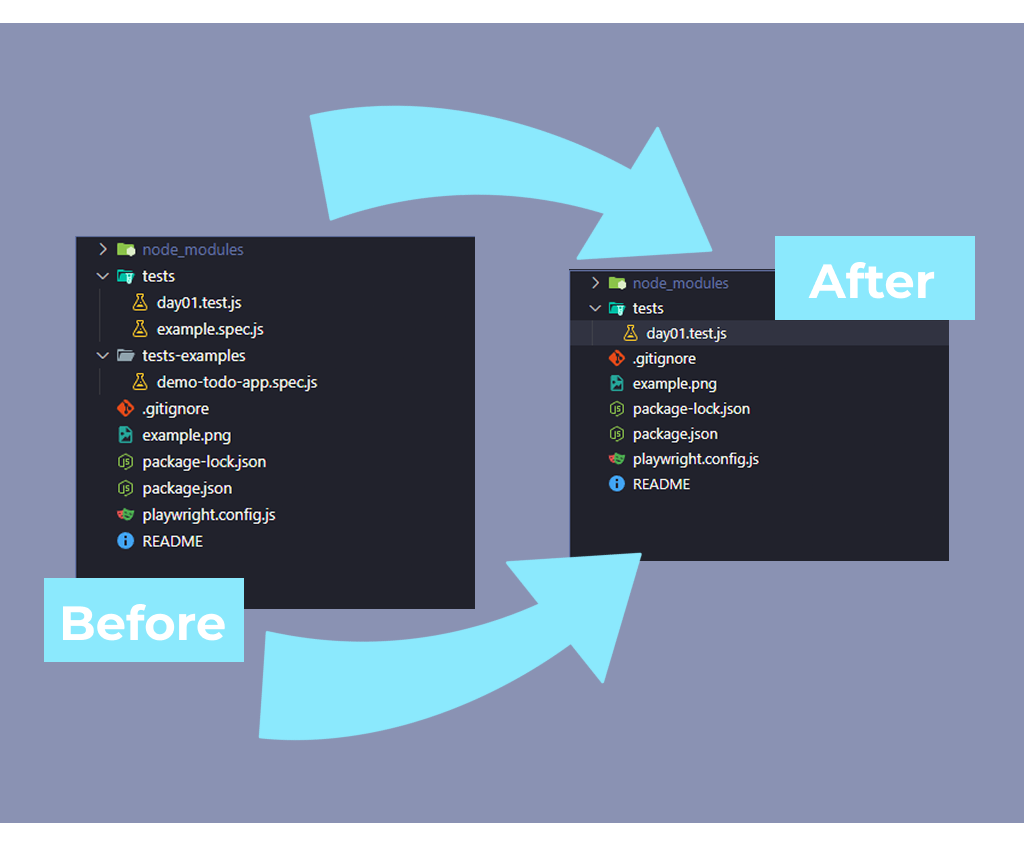
I also duplicate the file day01.test.js and rename it to day02.test.js.
I changed the import from CommonJS Module to ES Module.
//Before
const { test, expect } = require('@playwright/test');

//After
import { test, expect } from '@playwright/test';
I also added test.describe for grouping related tests and create 2 new tests:
import { test, expect } from "@playwright/test";

test.describe("Register account", () => {
  test("Create a account with balance successfully", async ({ page }) => {
    // Navigate to home page
    await page.goto("https://bugbank.netlify.app");

    // Check if I am in the home page
    await expect(page).toHaveURL(/bugbank\.netlify\.app/);

    // Check if page has the text
    await expect(page.locator("h1")).toHaveText(
      "O banco com bugs e falhas do seu jeito"
    );

    // I will click on register button to navigate to register page
    await page.getByText("Registrar").click();

    // Check if there is 'Cadastrar' button if yes I am in the register page
    await expect(page.getByRole("button", { name: "Cadastrar" })).toBeVisible();

    // Lets fill the form with some information
    await page.getByPlaceholder("Informe seu nome").fill("John Doe");
    await page.getByPlaceholder("Informe seu e-mail").fill("johndoe@example.com");
    await page.getByPlaceholder("Informe sua senha").fill("password123");
    await page.getByPlaceholder("Informe a confirmação da senha").fill("password123");

    // Select option true to initiate an account with balance
    await page.locator("#toggleAddBalance").click();

    // Click in register button
    await page.getByRole("button", { name: "Cadastrar" }).click();

    // Check if account was created with balance
    await expect(page.locator("#modalText")).toContainText(
      "foi criada com sucesso"
    );
  });

  test("Create a account without balance successfully", async ({ page }) => {
    // Navigate to home page
    await page.goto("https://bugbank.netlify.app");

    // Check if I am in the home page
    await expect(page).toHaveURL(/bugbank\.netlify\.app/);

    // Check if page has the text
    await expect(page.locator("h1")).toHaveText(
      "O banco com bugs e falhas do seu jeito"
    );

    // I will click on register button to navigate to register page
    await page.getByText("Registrar").click();

    // Check if there is 'Cadastrar' button if yes I am in the register page
    await expect(page.getByRole("button", { name: "Cadastrar" })).toBeVisible();

    // Lets fill the form with some information
    await page.getByPlaceholder("Informe seu nome").fill("John Doe");
    await page.getByPlaceholder("Informe seu e-mail").fill("johndoe@example.com");
    await page.getByPlaceholder("Informe sua senha").fill("password123");
    await page.getByPlaceholder("Informe a confirmação da senha").fill("password123");

    // Click in register button
    await page.getByRole("button", { name: "Cadastrar" }).click();

    // Check if account was created with balance
    await expect(page.locator("#modalText")).toContainText(
      "foi criada com sucesso"
    );
  });
});
Lets run the tests and see if everything is working as expected. If you have playwright extension installed in your IDE, you can run the tests directly from there.
If you dont follow the updates in the projects or if you didnt know, I have a repository where you can find all the code examples from this series:
Link to GitHub projectI would like to challenge you, clone the repository and improve it creating more cases for example: Case to validate blank fields Invalid email format Invalid name format
You can be creative and come up with your own test cases as well!
Conclusion
In this lesson, we covered the basics of using Playwright for end-to-end testing. We learned how to interact with elements on a page, make assertions about the state of the page, and use test hooks to manage our test lifecycle. We also explored a simple test case for the BugBank create account, which included navigating to the page, checking the URL and content visibility, and create a account.
With this knowledge, you should be able to start writing your own tests using Playwright. Remember to refer to the official documentation for more advanced features and best practices.
Thank you for reading and see you in the next lesson! ☕💜